We’ve created a new extension which will use (at the moment) Twilio to send these messages. If you’re on this page and you’ve bought the extension then Thank You.
This article will explain how to set up the plugin easily. So once you have downloaded the plugin, login to your wp-admin portal. You will need to make sure you have Mobile DJ Manager 1.7.0 installed.
Installing the Plugin
- Login to your WordPress administration screen and select the “Plugins” -> “Add New” from the menu
- Select “Upload Plugin” from the top of the main page
- Click “Choose File” and select the mdjm-sms-sender.zip file you downloaded
- Click “Install Now”
- Once installation has finished, select “Activate Plugin”
- Once activation has completed, MDJM SMS Sender will be fully integrated with Mobile DJ Manager
Configuring the Plugin
- On the left, hover over MDJM Events and click on Settings.
- Click on the Licenses tab and enter your license key – the extension will not work without this. Press Save Changes
- Click on the Extensions Tab then the SMS Sender extension.
- Tick the box and then select Twilio from the SMS provider box. Make sure you click Save. If the box remains unticked, check you have put in your license key and it’s showing as active.

5. Head over to the Twilio Website and click on the blue “Start For Free” button in the top right.
6. Fill out the details in the main box:

7. Go through the verification process and then use these settings on the next screen:

8. Set up your phone number by following the steps on screen and then scroll down to get your Account SID and Auth Token. Copy those fields and paste them into the relevant boxes on the MDJM Settings.
The Messaging Service SID we will get later.
9. Once you’ve put the details in there, the Credits Remaining will throw a HTTP 401 error. This can be ignored for now.

10. To turn off replies (and saving you some credits), follow this guide from the Twilio website:

11. Once you have done the steps above, you must get a Messaging Service ID. To get this, click on the Develop menu on the left, then Messaging –> Services.

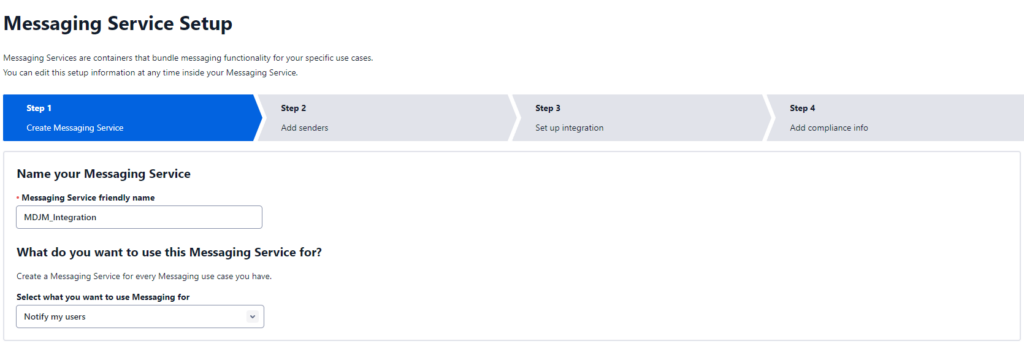
12. In the first Step, give it a Friendly Name. We recommend MDJM_Integration but you can call it what you like. Then click on Create Messaging Service button.

13. On Step 2, You want to Add senders and select the Alpha Sender option. Choose the number you want to pair up with this.

14. Leave Step 3 as is.
15. Leave Step 4 as is.
16. Once set up, go back to the Phone Numbers –> Manage –> Active Numbers menu.
17. Click on the mobile number you want to assign the Alpha ID to
18. Scroll down to the Messaging box and then select the new Integration you set up in the Messaging Service box then click Save Configuration.

19. Now go back to the Messaging –> Services menu
20. Copy the Messaging Service ID and paste that into the Messaging Service ID box in the MDJM Settings.
21. Save your changes in the MDJM Settings. Don’t forget to add credits into your Twilio account.
Setting up Templates
- Click on the MDJM menu on the Left hand side
- Click on SMS Templates
- Click on Add Template
- Here you can create SMS templates to send to your clients. Remember… each SMS has a limit of 160 characters so if your template is 161 characters, you will use 2 SMS credits.
Sending an SMS
You can only send SMS messages from the relevant Event.
- Head over to the event for the client you want to send a message to.
- In the metabox, select the template you want to send to your client then click on Send SMS.

3. Once the message has been sent, it’ll come up with the SMS Sent Successfully message.

